10.2 Mail Merge
Everyday communications between colleagues, business partners, a business and a customer, a non-profit and its donors can take many shapes or forms. Thank you notes, reminders, product updates, invoices, and many other topics may require an individual to send identical documents with small changes to each document such as the recipient’s name, address, donation amount, product number, purchase date, or more. Mail merge automates the tedious task of copy-pasting a large number of data from one application to another one field at a time a hundred or a thousand times over. We can use mail merge in Word or Outlook while depending on a data source from Excel or Access and allow employees to process hundreds or thousands (or more, depending on your processing speed or patience) of records to populate fields (name, address, donation amount, etc.) in a pre-written document or email.
“With the combination of your letter or email and a mailing list, you can create a mail merge document that sends out bulk mail to specific people or to all people on your mailing list. You also can create and print mailing labels and envelopes by using mail merge (support.office.com).”
We will use the Mockaroo_Cars sheet in the Ch10_Data_File in combination with a Word document to create a letter to mail to our clients regarding an extended warranty offer for their vehicle. The Mockaroo_Cars sheet is a “dummy” dataset about fictional consumers, their addresses, and their vehicles generated at https://mockaroo.com/. The data set generated online is archived here for educational purposes.
- Open the Ch10_Data_File and go to the Mockaroo_Cars sheet.
- Observe the field names in the header row.
- How would these appear on a mailing label?
- How would you add them as an address block in a letter?
- How much time would it take for you to manually copy and paste the car_model (Column K) and the car_year (Column L) into a letter that wishes to personalize content for its recipients?
- Open a blank Word document. Highlight, copy and then paste the following text into it. “Address|Dear [name],|We are pleased to inform you about our ongoing special regarding your [car_model, car_year].|Please contact us regarding this limited time offer and schedule a meeting with your service advisor.|Sincerely,|Mockaroo Cars.” Replace the | symbols with hard line breaks using the ENTER key to format your document to match Figure 10.2.1 below.
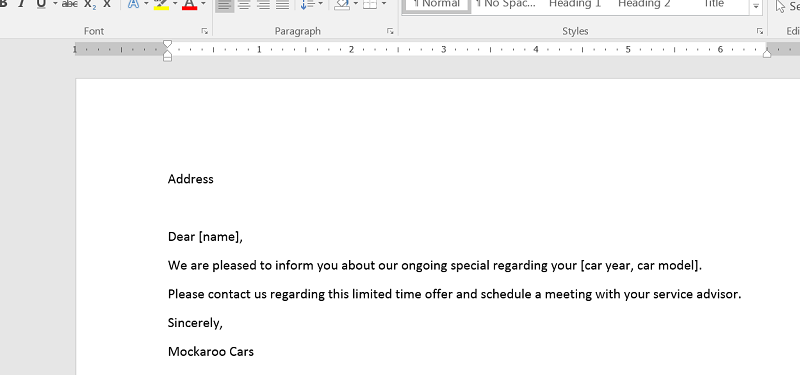
Figure 10.2.1 Word document with pre-written content. - Save your document as Mail_Merge_Sample.docx in the folder where you have been saving your course-related documents in a subfolder under Chapter 10.
- Click into the Mailings Tab > Start Mail Merge > Step-by-Step Mail Merge Wizard as shown in Figure 10.2.2.
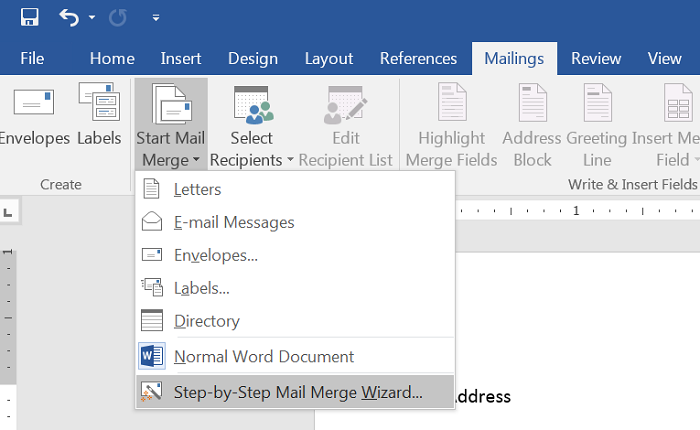
Figure 10.2.2 Starting a Mail Merge Wizard. - You will be asked to confirm the type of mail merge you wish to complete. In the navigation pane that appears on the right side of your window, make sure the Letters option is selected as the document type. Click ->Next: Starting document as shown in Figure 10.2.3.
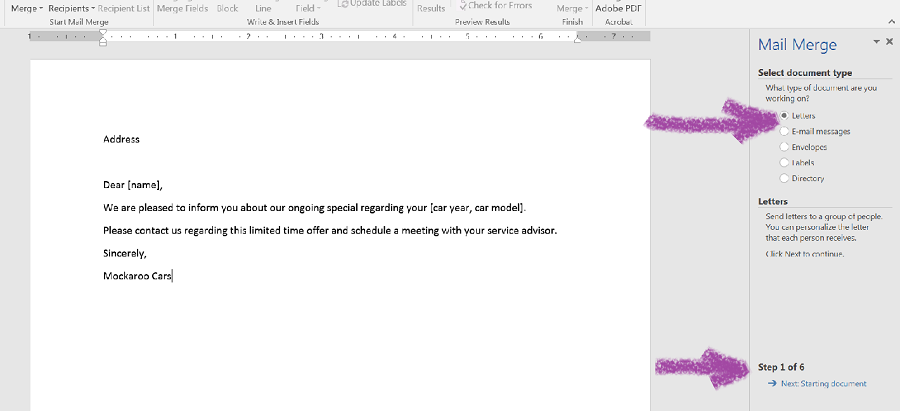
Figure 10.2.3 Selecting document type. - You will be asked to confirm whether you wish to use the document you have open or other sources. Select the Use current document option for this practice at the top of the navigation pane. At the bottom, click Next: Select recipients as shown in Figure 10.2.4.
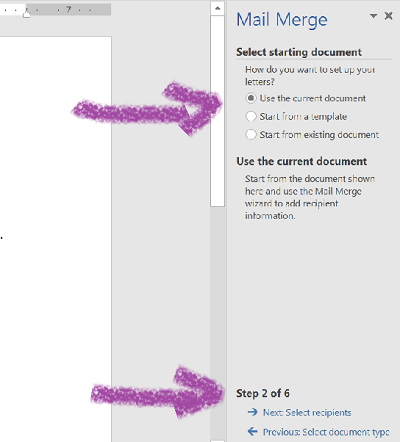
Figure 10.2.4 select your starting document. - Next, you will select the fields you want to use from your Mockaroo_Cars sheet Excel file. Under the Mail Marge pane on the right, under Use an existing list, (1) click Browse to select names and addresses from a file or database. Navigate to the folder where you downloaded the Ch10_Data_File and (2) select the Mockaroo_Cars sheet. Make sure that the checkbox is selected next to the First row of data contains column headers option as shown in Figure 10.2.5. (3) Click Next: Write your letter.
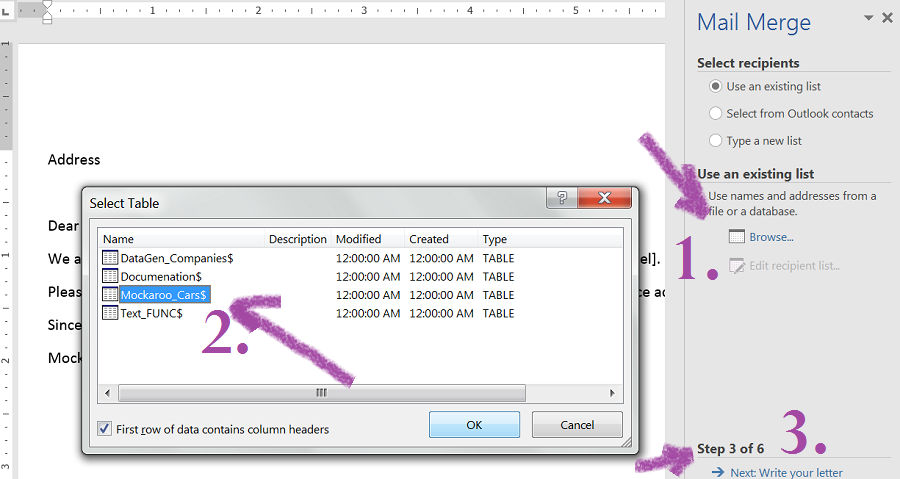
Figure 10.2.5 Selecting your data source. - A dialogue box will allow you to confirm the Data Source, correct sheet/fields and to make edits as needed. Click OK upon approval of the contents shown.
- In the pane on the right, you will see the Write your letter options. This is the time for you to update your letter with the data from your Excel sheet to populate fields like Address, Dear [name], [car year, car model] in your Word document. Click Address block… and preview how the default selection appears based on your data. You can use the Match Fields… button to call up more fields from your Excel file as shown in Figure 10.2.6.
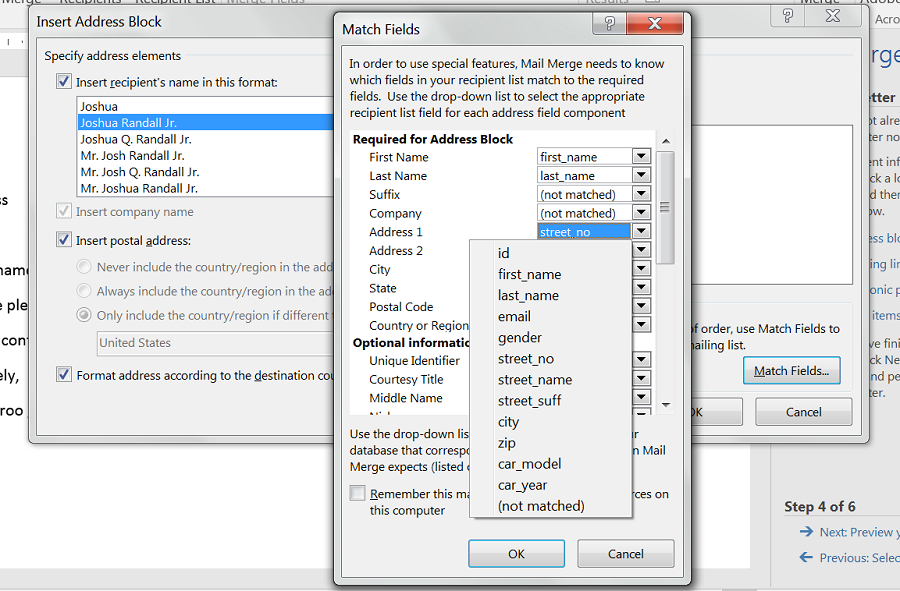
Figure 10.2.6 Matching fields from your Excel list to create the desired address block. - You have two options as your Excel field names don’t necessarily map out onto an Address Block exactly as you would like. (1) You can insert all the fields through the Match Fields… button and dialogue box as is and then edit the line breaks manually on the next step. (2) You can also go back to your Excel sheet and use the CONCATENATE function to merge the customers’ addresses into single lines (street_no, street_name, street_suff), save your Excel file, then Browse to select your source again. For option (2), your field name for the combined address line will show up as your Address Block. You can now delete the Addresses word from before Address Block in your Word document we used as a placeholder.
- Click Greeting Line… and replace Dear [name] with an option of your choice from the available presets as shown in Figure 10.2.7.
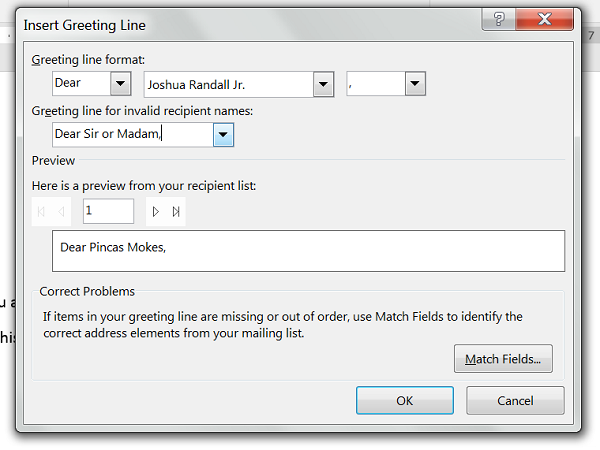
Figure 10.2.7 Greeting line options. - Go to More items… and insert the fields for car year and model. Your Word document should match what is shown in Figure 10.2.8 (without the yellow highlighting).
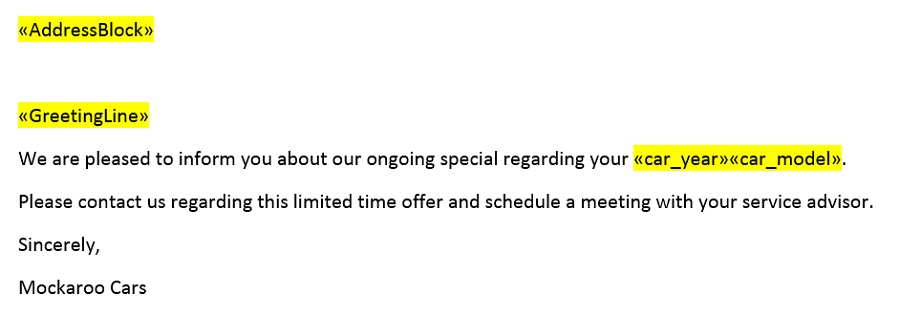
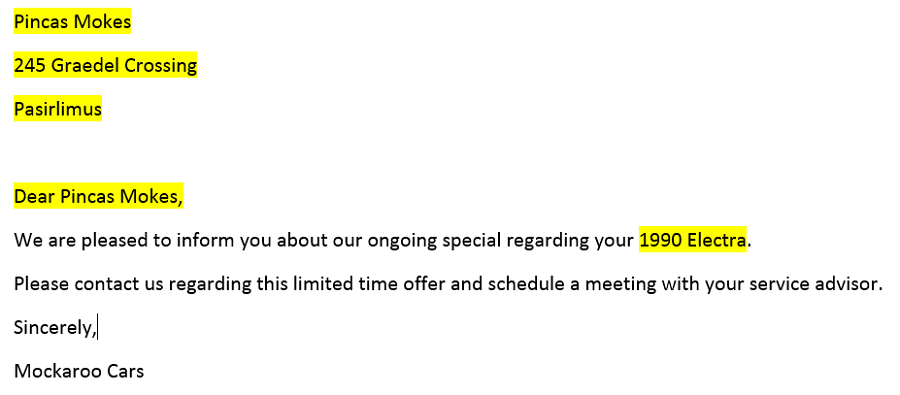 Figure 10.2.8 Preview of your fields inserted into your Word document.
 - You can now Complete the merge. It is best to save all letters you are creating as a separate file, that way you can have a record of all mailers in a New Document. You will as many pages in Word for your customers as the number of records in your Excel sheet. Depending on your processing speed and working memory, this process may take a few minutes.
Mail Merge e-Mail Exercise
Complete this 10-minute training on support.office.com to practice other forms of mail merge at the official Microsoft Office website.

ATTRIBUTION
Chapter by Emese Felvégi. CC BY-NC-SA 3.0. Dummy data set from https://mockaroo.com archived here for educational purposes.
Media Attributions
- Figure_10-2-1
- Figure_10-2-2
- Figure_10-2-3
- Figure_10-2-4
- Figure_10-2-5
- Figure_10-2-6
- Figure_10-2-7
- Figure_10-2-8
- Figure_10-2-9
- Tutorial

