
Chapter 3: Minerals
Classification, Identification, and Critical Minerals
This book contains exercises for a physical geology lab class. It is under development, with a full 1st edition release planned for Fall 2024.
Learning Objectives
The goals of this chapter are to:
- Apply various techniques to determine mineral properties
- Identify common minerals using physical properties
- Analyze critical and strategic minerals
3.1 Geologists Like to Describe and Classify
Geologists must make sense of the Earth’s numerous naturally forming materials. Because there are thousands of these materials, a detailed description and classification scheme are important. After all, these Earth materials are where most of the elements used in the manufacturing of everyday items come from.
Exercise 3.1 – Recognizing Earth Materials
To help you learn this classification, use the collection of Earth materials provided by your instructor. Classify and sort these Earth materials into groups based on any criteria you want to use. Your instructor may ask you to re-classify the materials several times using different criteria.
- What criteria did you use? Why?
- If you were asked to reclassify, what other criteria did you use?
- What were the final criteria you used? Do you think this is a better classification scheme than the first one you tried? Why?
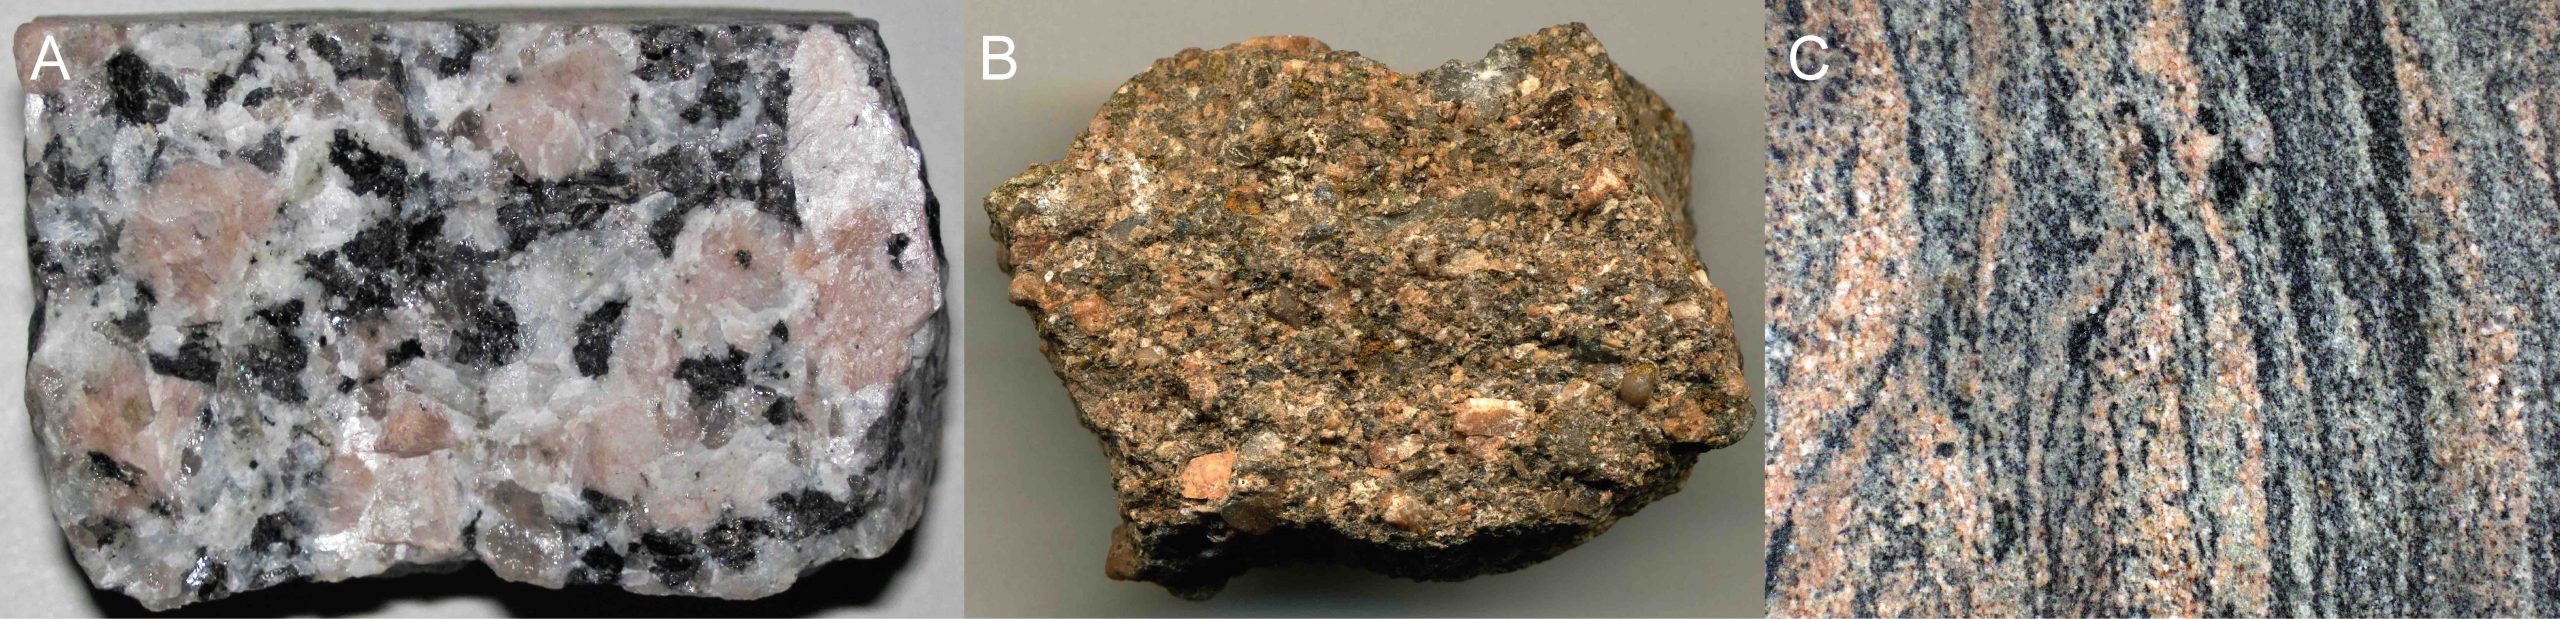
An important distinction to make in Earth materials is the difference between a mineral and a rock. Minerals are the basic building blocks of rocks, which means rocks are made up of different combinations of minerals or just one mineral in some cases. A mineral is a naturally occurring, usually inorganic, solid that can be defined by a chemical formula and a crystal structure. Figure 3.1a is an example of a rock called granite, which is made up of a combination minerals. Figures 3.1b and 3.1c are two other types of rocks, sandstone and gneiss. They contain the same minerals as the granite in Figure 3.1a. Even though they contain the same minerals, all three of these rocks formed in different ways. We’ll get to that a little later, so for now, let’s focus on minerals.
3.2 Physical Properties of Minerals
An essential skill for a geoscientist is to be familiar with mineral names and compositions and be able to recognize them in rocks, but there are over 4,000 known minerals, which makes for an impossible task. Luckily, for most Physical Geology classes, there are only about twenty or so minerals you’ll need to be familiar with. The way that you can tell them apart is by their physical properties, which can be observed or tested using common items:
- Color
- Luster
- Streak
- Hardness
- Cleavage and fracture
- Other properties
We will go through these systematically so that you can become skilled at these techniques. Some of the minerals you will work on in this lab are found in many rock types, and others are only found in special settings such as ore deposits.
One more thing: Often, you can find identifying features simply by looking at the mineral. Sometimes, you need to look closer at the mineral using a hand lens (a type of magnifying glass). The correct way to use a hand lens is to hold it up to your eye and move the rock or mineral in or out until it comes into focus (Figure 3.2).

Color
Color is an eye-catching property of minerals. Some minerals have unique colors, such as sulfur, which is always lemon yellow. However, color is not always a diagnostic property because some minerals come in several colors based on the chemical elements present in the crystal structure. For example, quartz can come in almost any color, and therefore its color is not diagnostic. Sometimes, the mineral structure is what determines its color. In other cases, a tiny amount of an accessory element will change the color. Also, mineral color can change when exposed to light, heat, or radiation.
Exercise 3.2 – Mineral Color
Even though color is not very diagnostic for most minerals, it’s still an important component in narrowing down your mineral identification when combined with other physical properties.
- Your instructor has provided you with a selection of minerals. Fill in Table 3.1 with sample numbers for each color.
Table 3.1 – Mineral Color Color Mineral Sample Numbers Black/gray Blue Green Red White/clear Yellow Other: ____________________ Other: ____________________ Other: ____________________ - What is the most common color in your assigned minerals? ____________________
- What is the least common color in your assigned minerals? ____________________
- Do you think any of your minerals have a unique color that can be used as a diagnostic property? Explain.
- For your minerals that do not have a unique color, is there anything else you can observe to help you tell the difference between them? Explain.
Luster
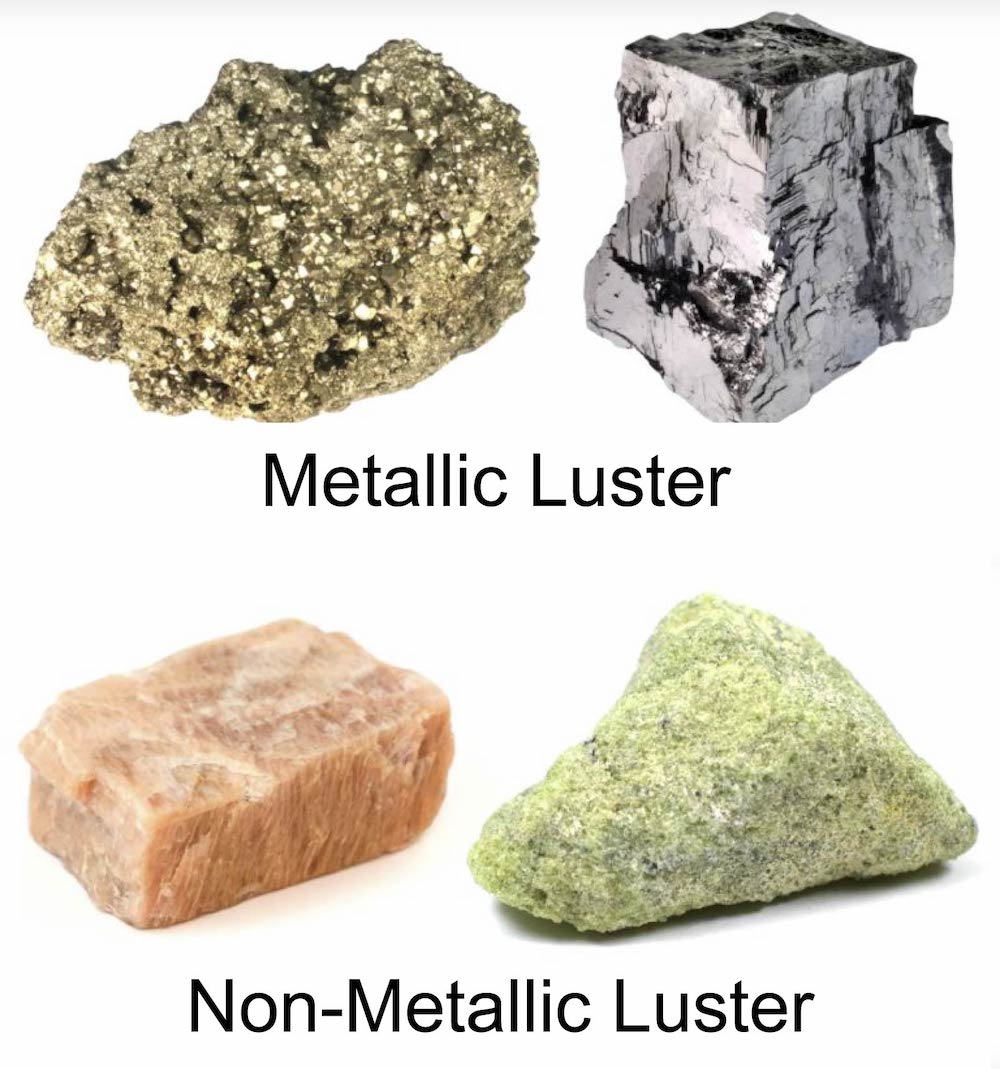
A mineral’s luster refers to how its surface reflects light or its “sheen.” Luster can provide valuable information when identifying minerals. Generally, a mineral’s luster can be described as shiny or dull or, in geologists’ lingo – metallic or non-metallic (Figure 3.3). In addition, luster determines how a mineral might be used commercially. The metallic luster of gold and silver makes them attractive, and the pearly luster of muscovite is used in cosmetics. Be careful to observe luster on clean, fresh surfaces as sometimes their luster can change with exposure to weathering.
- Minerals with a metallic luster look like a polished, highly reflective metal. On a molecular scale, light cannot pass through metallic minerals.
- Minerals with non-metallic luster do not look like polished metal. Light does pass through non-metallic minerals. Be careful because these minerals can still be shiny. Many additional terms exist to describe the luster of non-metallic minerals, such as vitreous/glassy, pearly, greasy, dull, earthy, etc., but these aren’t the focus of this exercise.
Exercise 3.3 – Mineral Luster
Your instructor has provided you with a selection of minerals.
- Identify the luster of your minerals and fill in Table 3.2 with the sample numbers.
Table 3.2 – Mineral Luster Luster Mineral Samples Metallic Non-Metallic - In the lecture, your professor may have described other types of luster than just these two. Do any of your samples have a different type of luster than these?
- Did you notice any other differences between your metallic and non-metallic minerals?
Streak
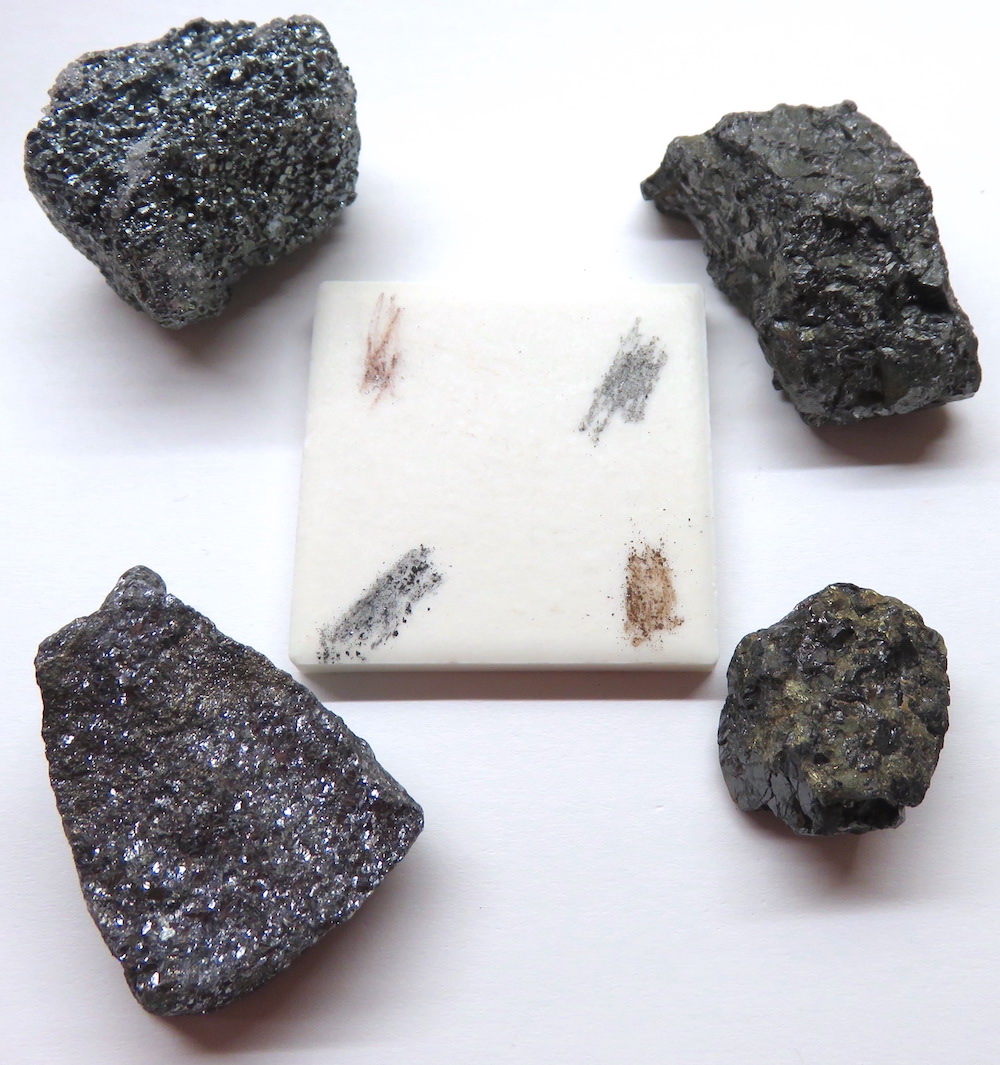
Streak is the color of a mineral’s powder. We can observe a mineral’s streak by scraping the mineral across a white or black unglazed porcelain plate called a streak plate (Figure 3.4). This may produce a small amount of powder on the surface of the streak plate. Some minerals have a different color streak than the mineral color. Most students use streak in Physical Geology labs but not in other situations.
- Place a streak plate flat on a table and hold the streak plate firmly.
- Place part of the unknown mineral on the streak plate.
- While applying a firm pressure, drag the mineral across the plate.
NOTE: If no powder is created, it means the mineral is harder than the streak plate.
The color of a mineral’s streak is often compared to that of the mineral. Figure 3.4 shows how some minerals have the same color streak as the mineral. Notice that two of these have a different streak than that of the mineral.
Exercise 3.4 – Mineral Streak
Your instructor has provided you with a selection of minerals.
- Identify the luster of your minerals and fill in Table 3.3 with your sample numbers.
Table 3.3 – Streak Color Streak Color Mineral Sample Numbers Same as mineral color Different than mineral color Did not produce a streak - Do you notice anything common between minerals whose streak color differs from the hand sample color? Explain.
- Critical Thinking: Do you think it would be useful to carry a streak plate with you when going to look at minerals in the field? Why or why not?
Hardness
The hardness of a mineral is a measure of its resistance to scratching. The Mohs Hardness Scale ranks the relative hardness of minerals from 1 to 10, with 1 being the softest and 10 being the hardest (Figure 3.5). Mohs scale is qualitative, which means there is no quantitative relationship between hardness values. This is one of the most important diagnostic properties for identifying a mineral. It is, however, one of the hardest to do in a rock because it has small mineral grains.
A mineral’s hardness is determined by a scratch test using materials of known hardness. The idea is that harder substances will be able to scratch softer ones. Common materials such as fingernails, copper coins such as pennies, glass, steel nails, and porcelain plates are used to conduct scratch tests, and all vary in hardness. To conduct a scratch test:
- Try to find a corner of the mineral that has not been too scratched up.
- Scratch the mineral. It is best to start with a utensil that is lower on the hardness scale and “work your way up” the scale by using harder utensils. If the mineral seems similar to the thing you’re using to scratch – scratch it really hard. When using the glass, try scratching the glass with the mineral, don’t try to scratch the mineral with the glass.
- When you scratch a mineral, sometimes it’s hard to tell if the powder is coming from the mineral (if you scratched the mineral), or if it’s coming from the thing you used to scratch it (the mineral is harder than the utensil). In this case, wipe the surface of the mineral with your finger to see if there is an actual mark left. If there is a mark, the utensil scratched the mineral.

Exercise 3.5 – Mineral Hardness
Your instructor has provided you with a selection of minerals.
- Determine the hardness of each of your minerals and fill in the sample numbers for each hardness in Table 3.4.
Table 3.4 – Mineral Hardness Hardness Mineral Sample Numbers < 2.5 2.5 – 3.5 3.5 – 5.5 5.5 – 6.5 > 6.5 - What is the most common hardness value? Why?
Cleavage and Fracture
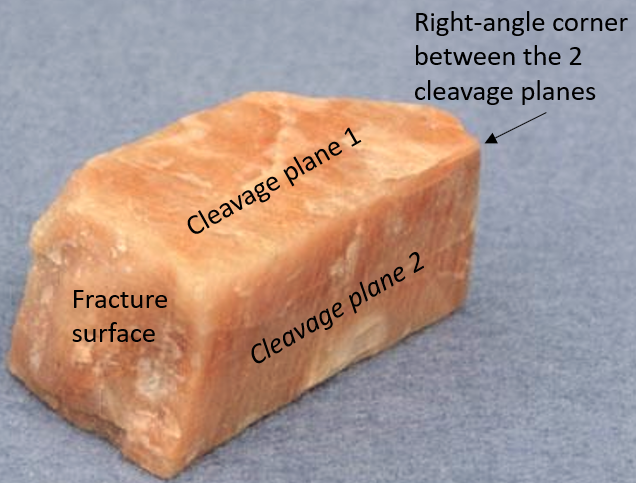
Cleavage is a term used to describe how minerals can break in a predictable way. When minerals break along planes in which chemical bonds are weak, they produce flat surfaces called cleavage planes. Minerals can have 1, 2, 3, or more planes of cleavage (Figure 3.6). When there is more than one plane, the angle between the planes needs to be described. Cleavage is one of the most challenging concepts for introductory geology students, but it is a useful property for identifying minerals. For example, amphibole and pyroxene have the same physical properties except for cleavage. Knowing whether a rock contains amphibole or pyroxene could reveal a lot about that rock’s geologic history, such as where and how it most likely formed.

While the concept of mineral cleavage is difficult, identifying cleavage in minerals doesn’t have to be. When looking at a mineral, the easiest way to identify cleavage is to shine a light on its surface. If that surface brilliantly reflects light, then you most likely have a cleavage plane. Today, just about everyone has a cell phone with a flashlight that can be used to identify cleavage. Or you can move the mineral around underneath an overhead light or use sunlight.
Minerals don’t always break in predictable ways, and that’s when we use the term fracture. Fracture describes irregular breakage in minerals, which usually occurs on mineral planes that don’t have any weak bonds (Figure 3.7). This sounds easy enough; flat surfaces mean cleavage and uneven surfaces mean fracture, but the truth is that it can be messy. Minerals can appear to have flat surfaces that are not actually cleavage, and fracturing can occur along planes of cleavage. This is why you need to look closely at the surface of a mineral using a hand lens.
You may need to use a hand lens to see a mineral’s cleavage. To use the hand lens properly, you need to place the lens up against your face and then move the mineral or rock sample back and forth to get it into focus. A common mistake students make is holding the mineral or rock at arm’s length and moving the hand lens; this is incorrect and will not help you see small-scale features in rocks and minerals.
Another thing that makes identifying cleavage difficult is the entire mineral sample does not have to take on the shape of the cleavages. Instead, you need to use a hand lens to look at the small details of a single side of the mineral. There will be slight changes in the heights of the surface that you wouldn’t be able to see without the hand lens. It is along those “elevation” changes that you should be looking for signs of cleavage. Then repeat your examination on the other sides.
This is probably the most difficult property to learn. For some minerals, it is also the most diagnostic property to distinguish them from similar-looking minerals.
Exercise 3.6 – Mineral Cleavage
Your instructor has provided you with a selection of minerals.
- Determine the number of cleavage planes and angles between them for each of your minerals and fill these numbers in on Table 3.5.
Table 3.5 – Mineral Cleavage Cleavage Mineral Sample Numbers 1 plane 2 planes at 90° 2 planes not at 90° 3 planes at 90° 3 planes not at 90° No cleavage fracture only
- Do all minerals have cleavage? Why or why not?
- Since cleavage can be used to distinguish between two minerals, give the sample number of two minerals that look similar but have different cleavage. What are the similar properties for these two minerals?
- Does a lack of cleavage help you distinguish between two similar looking minerals? If so, which minerals are these?
- Sometimes, instead of using cleavage planes, you can distinguish a mineral by the pattern developed when a mineral is broken. Do any of the samples that lack cleavage have a distinctive fracture pattern. Describe it.
Other Properties
Minerals can also have other diagnostic properties. For many minerals, these are unique and an easy way to identify the mineral. Properties that might be useful include:
- Magnetism – Some minerals may be magnetic and are attracted to magnets. This property can help identify certain minerals, such as magnetite. Hematite is also weakly magnetic.
- Reactivity – Certain minerals may react with acids and fizz or effervesce. For example, calcite will react with weak hydrochloric acid and fizz. Geologists use acid that is about the same strength as vinegar for mineral testing. Be sure to wipe up any spills and don’t get the acid on your clothes.
- Taste, Touch, and Odor – Some minerals have distinct tastes (ex. halite tastes salty), feels (ex. talc feels greasy), or odors (ex. sulfur smells like rotten eggs) that can aid in identifying minerals.
- Optical Properties – Some minerals may exhibit optical properties, which can be useful for mineral identification. Try looking at printed text through a calcite crystal, and you may see a “double image.” This optical property is called double refraction and is caused by light splitting into two rays with different velocities and directions of propagation.
- Density – Density is the mass per unit volume of a mineral. Different minerals have different densities due to varying chemical compositions. You can get a general understanding of a mineral’s density by feeling the weight of the mineral in your hand. A dense mineral may feel particularly heavy. Galena is an example of a mineral with a high density.
- Fluorescence – One of the most amazing properties seen by shining a UV light source at a mineral. Calcite and gypsum often fluoresce. Be careful not to shine UV light into anyone’s eyes as it can damage the eye.
- Twinning – One property that you probably haven’t thought about is how minerals interact when the crystals are growing. Some minerals grow together resulting in two or more intergrown crystals that are mirror images of each other. This symmetry is called twinning. Staurolite crystals can grow together and form a distinctive cross that is a result of twinning.
Exercise 3.7 – Other Mineral Properties
Your instructor has provided you with a selection of minerals.
- Determine which of your minerals exhibits any other properties and record them in Table 3.6.
Table 3.6 – Other Mineral Properties Property Mineral Sample Numbers - Which is your favorite unique property from this list? Why?
3.3 Mineral Names
Nowadays, mineral names are based on mineral appearance, mineral chemistry, where the mineral is found, a famous scientist, or anything else deemed important by a mineral’s discoverer. The naming of minerals has changed over time from alchemistic beginnings to the advanced science of today. You will notice that many mineral and rock names end in ite?” The suffix “ite” is derived from the Greek word ites, the adjectival form of lithos, which means rock or stone.
In antiquity, distinctive physical characteristics, such as color, were used for a mineral’s name. For example, garnet comes from an old French word grenate for blood-red. Two minerals with similar composition are malachite and azurite (both Cu2CO3(OH)2). Malachite comes from the Greek word malakee or malache, used to describe the green leaves of the mallow bush. Azurite comes from azure, the Arabic word for blue. Another blue mineral is kyanite which comes from kyanos, the Greek word for blue. Some minerals have been named for their chemistry or their structure. For example, cavansite is named for its chemistry (calcium vanadium silicate), and pentagonite is named after a five-sided pentagon is five-sided.
So, if you suspect you have a new mineral, your proposed name gets approved by the Commission on New Minerals, Nomenclature and Classification part of International Mineralogical Association (IMA). Also as of July 2023, the Handbook of Mineralogy lists 5,663 species, and the IMA Database of Mineral Properties/Rruff Project lists 5,956 valid species (IMA/CNMNC) of a total of 6,189 minerals. Fortunately for you, there are just about a dozen mineral names that you should learn to recognize. See the appendix for the origin of the common mineral names.
Exercise 3.8 – Mineral Names
Use the information you gathered in Tables 3.1 to 3.6 to identify the minerals and complete the ID table. Your instructor will provide you with an identification table of common minerals and their physical properties. Based on the properties you observed for your unknown minerals, determine their names. Record the names in the identification table.
- Are any of your minerals identifiable using only one of these properties? List the mineral names and the property.
3.4 Critical and Strategic Minerals
If we already know so much about minerals, why do we keep on studying them. The simple answer is they are often resources used to make our lives better. For example, over the past 20 years, annual trade in energy-related critical minerals has increased from US$ 53 billion to US$ 378 billion. Critical and strategic minerals play a significant role in national security, the economy, renewable energy development, and infrastructure. The list of minerals the United States has deemed critical and their uses can be found on the USGS website. You’ll notice that most of the names on this list are just elements, like aluminum or lithium. Many elements on the periodic table do not occur freely in nature. Naturally occurring deposits of pure aluminum or lithium do not exist on Earth. Instead, these elements are included as part of the chemical composition of minerals, and these minerals need to be mined and processed to extract the elements. For example:
- Aluminum primarily comes from a type of rock called bauxite, which contains minerals such as gibbsite [Al(OH)3], boehmite [γ-AlO(OH)], and diaspore [α-AlO(OH)].
- Lithium primarily comes from the minerals petalite [LiAlSi4O10], lepidolite [K(Li,Al)3(Al,Si,Rb)4O10(F,OH)2], and spodumene [LiAl(SiO3)2] as well as brines (salty water that contains a lot of dissolved elements or compounds).
Exercise 3.9 – Critical and Strategic Minerals of the U.S.
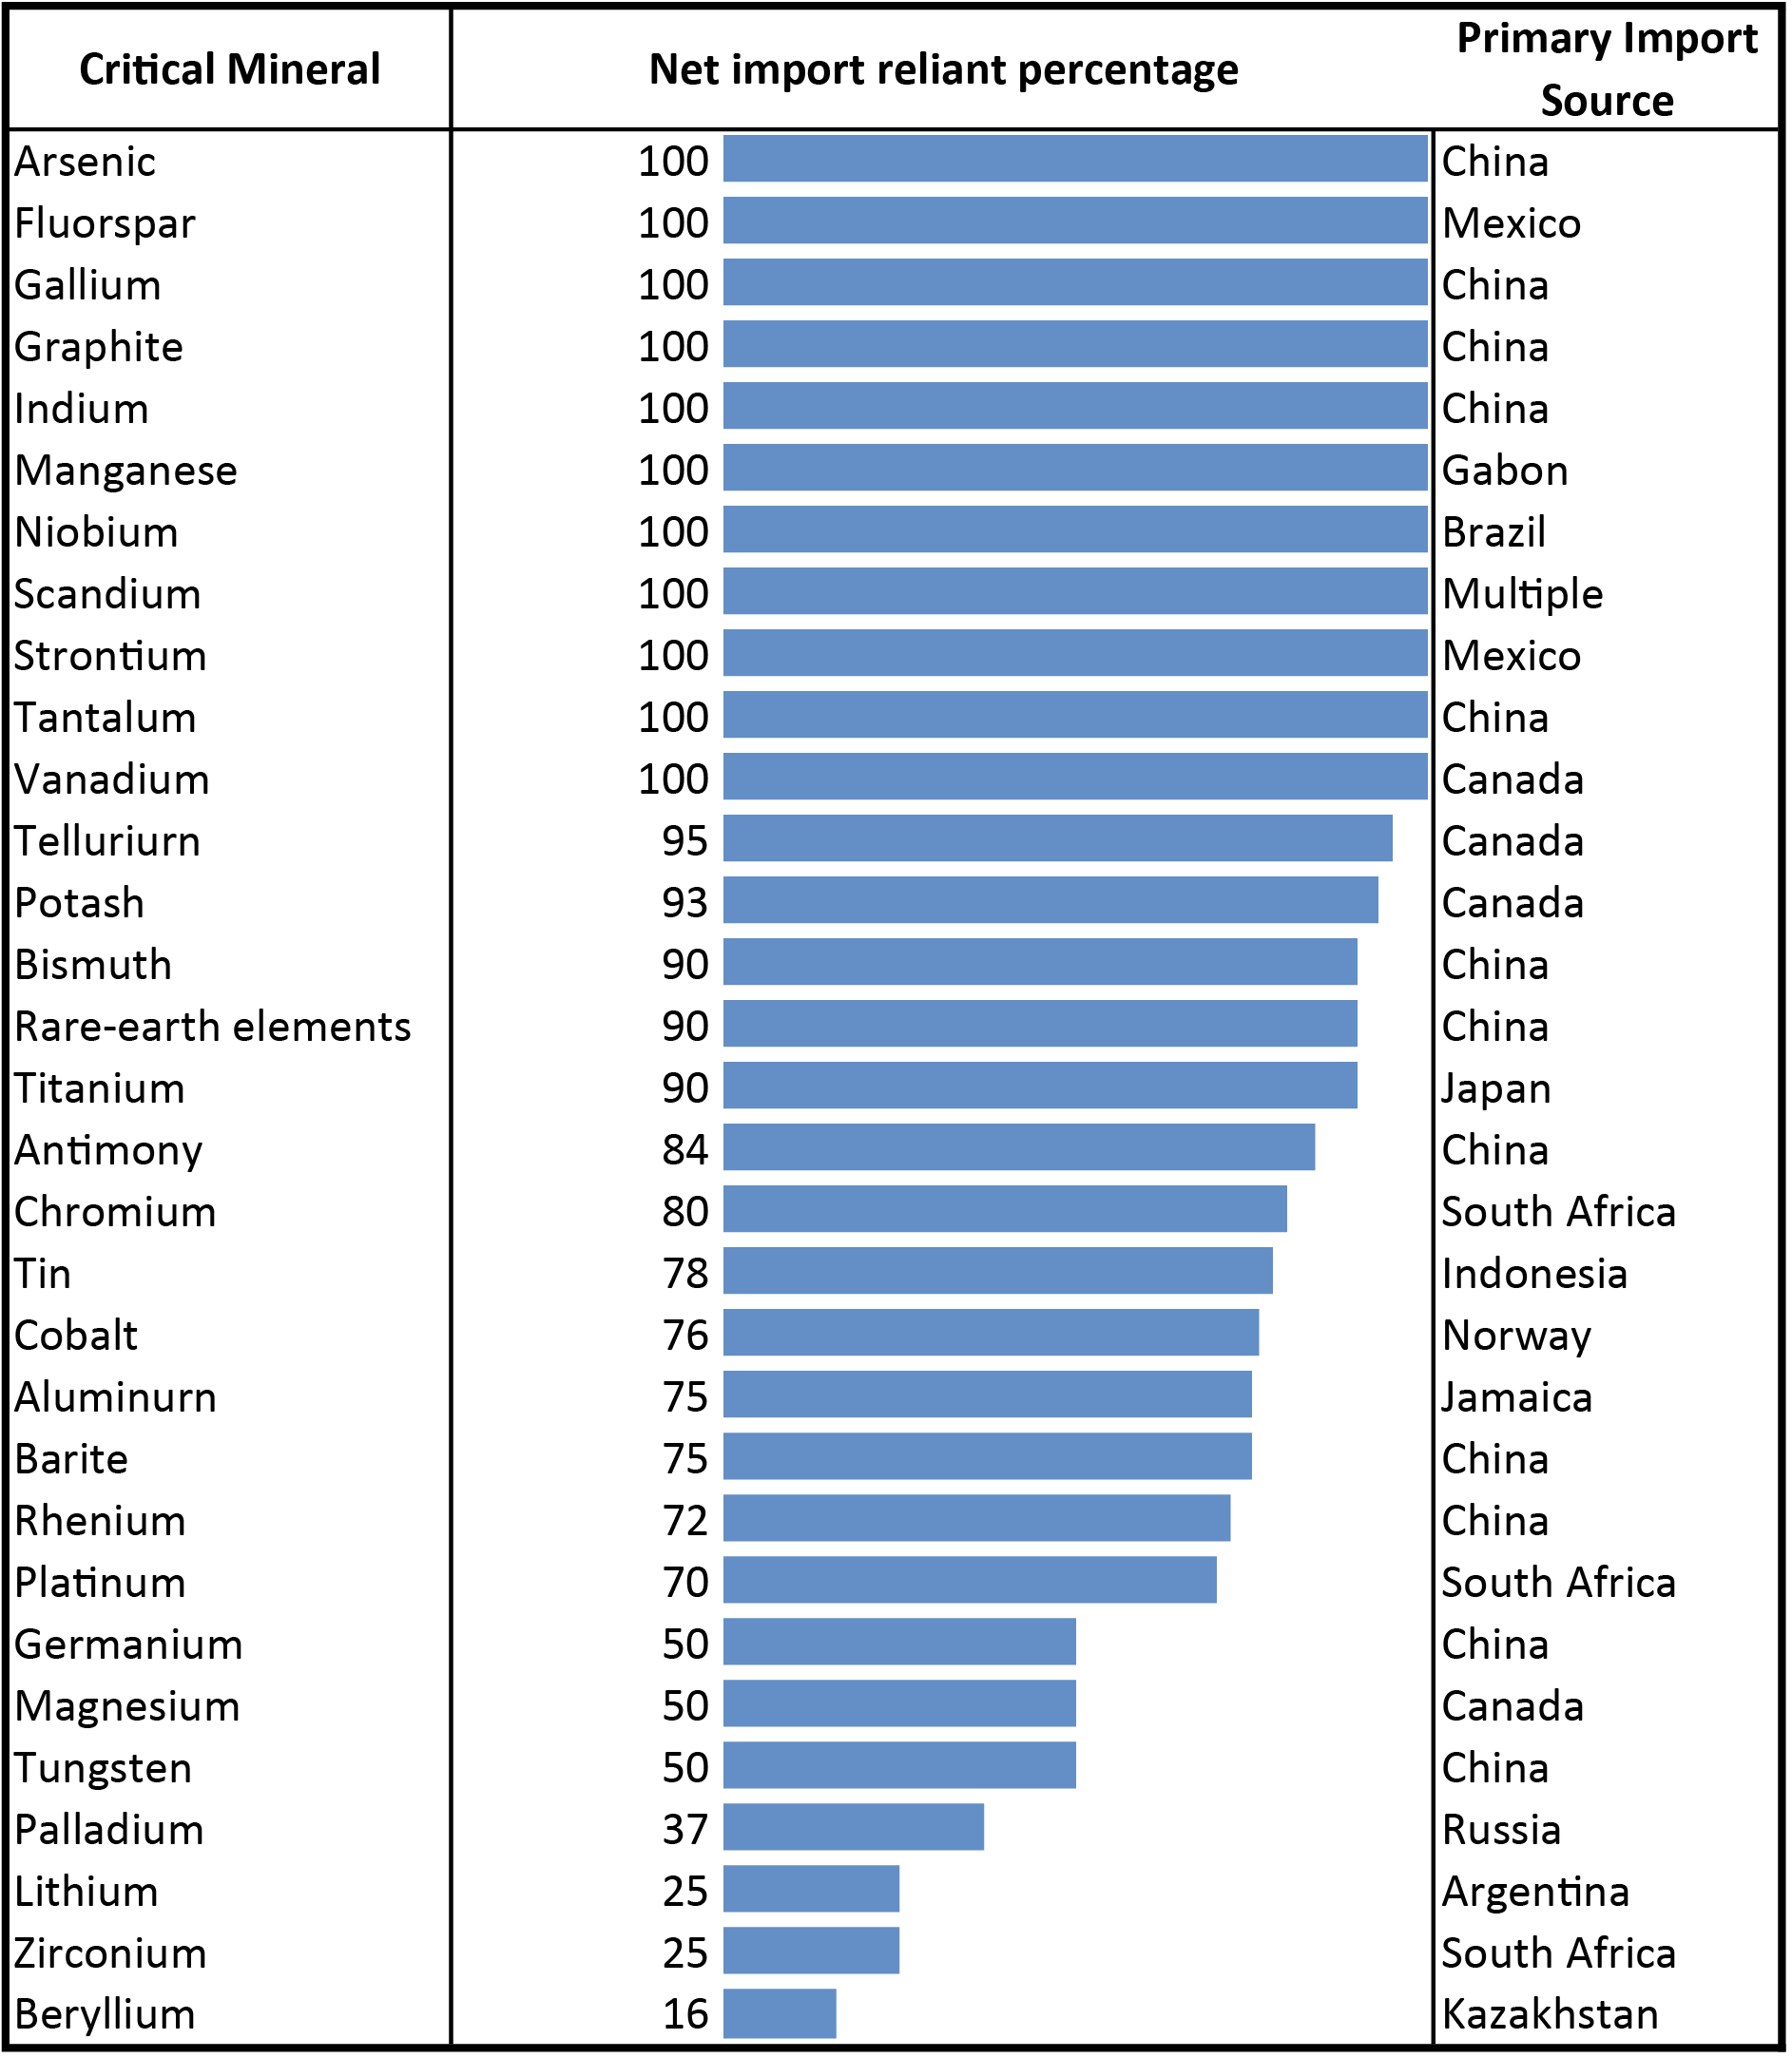
While the U.S. has it’s own sources of some critical minerals, it’s still reliant on imports to meet manufacturing needs.
- Figure 3.8 shows the known locations of critical minerals in the United States. What are some of the most common critical minerals?
- What are some of the least common critical minerals?
- Geologically speaking, where are most of the critical mineral deposits found?
- Are any of the minerals in your kits considered critical or strategic? ____________________
- Which critical minerals are found in your state? (Not from the U.S.? Look at this interactive world map for your country instead.)
- Despite having significant critical mineral deposits, the United States is still heavily dependent on importing critical minerals (Figure 3.9). Which two countries is the U.S. most dependent on for critical minerals? ____________________
- Let’s visualize where the United States imports critical minerals from. Complete the pie graph using data from Figure 3.10 for the number of critical minerals imported per country.
- Critical Thinking: Gallium is an example of a critical mineral found in many areas of the U.S. but has not been produced since 1987, according to the USGS. Why do you think the U.S. isn’t producing gallium?


Additional Information
Exercise Contributions
Virginia Sisson, Daniel Hauptvogel
a naturally occurring, inorganic, solid that can be defined by a chemical formula and a crystal structure.
found as a native mineral that is always lemon yellow and consists only of sulfur (S). It is found near volcanic vents and in the cap rock of salt domes.
a hard white or colorless mineral consisting of SiO2, silicon dioxide, found in all rock types, the stable polymorph at the Earth's surface. It is often colored by impurities as in amethyst and citrine.
the process of being worn by exposure to the atmosphere

_and_quartz_(gray)_grains.jpg#file)