
7.3 Templates
Learning Objectives
- Use an existing Microsoft Excel template to create a new spreadsheet.
- Create a custom template to create new spreadsheets.
A template is a predefined pattern for a spreadsheet that has already been created for you. Hundreds of templates, already created by Microsoft, are available for you to use inside Excel. These templates are very helpful if you have limited time to get a new task done in Excel, and you don’t know where to start. Templates do a lot of the work for you! Templates include all the formulas, formatting, etc. needed in a professional Excel spreadsheet. All that’s left to do is enter the data. Predefined Microsoft templates include everything from billing statements to blood pressure trackers to business cards. Categories include: Business, Personal, Industry, Financial Management, Logs, Calculators, and Lists.
Sometimes you need a very specific template that hasn’t already been created by Microsoft. Taking the time to create your own template will allow you to use this spreadsheet pattern to create files from it over and over again. If you need to create a new version of a spreadsheet on a regular basis, templates will make this work much easier. In this chapter we will explore using existing Microsoft templates, as well as, creating our own templates.
Let’s start by trying out a predefined, Microsoft template:
- Click the File tab in the ribbon.
- Click New in the Backstage View.
- Click in the Search box for Online template.
- Type Travel and press ENTER.
- Click on the Travel Expense Report and click Create. NOTE: If this template is not available, ask your instructor which template you should choose.
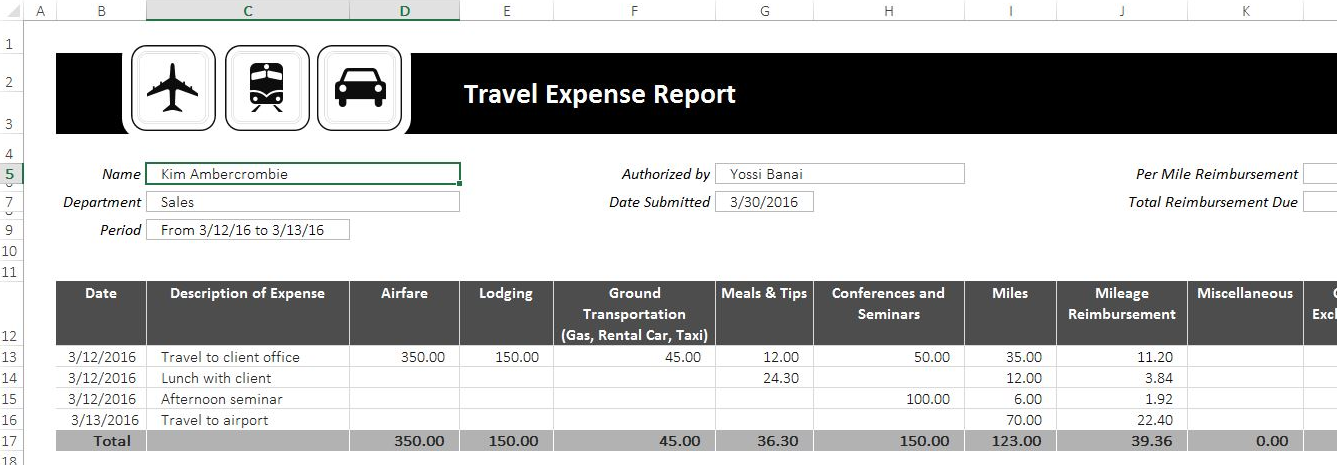
Your screen should look like Figure 7.9 below. Notice the design, layout, and formulas have already been set up for you.
Try using the template by doing the following:
- Change the Name to your name.
- Change the Department to CAS.
- Press CTRL+~ to see where the formulas are in the sheet. Working in the formula view helps you see where the formulas are, so you won’t delete them.
- In formula view, carefully delete just the data. Don’t delete any formulas!
- Press CTRL+~ again to return to Normal view.
- Enter dates and expenses for a trip of your imagining in the first three rows under the column headings.
- Save the completed file as CH6 Travel Expenses. Close the file.
Skills Refresher
To use a Microsoft predefined template:
- Click on the File tab in the ribbon.
- Click on New
- Type the desired template description in the Search box, and press ENTER.
Now let’s shift to creating our own template. Sometimes you create a blank template first and then create spreadsheets from it. Other times, you have an existing spreadsheet that you realize you need a template for, so that you can recreate the file with new data over and over again. We’ll turn our existing CH6 Personal Budget file into a template now, and in the assignments at the end of the chapter, we’ll start templates from scratch before a filled-in spreadsheet is created.
- Open your CH6 Personal Budget.xlsx file.
- Group the month sheets (January through December).
- Press CTRL+~ to switch to Formula view.
- We only want to delete data from these sheets – not labels or formulas. The only data is in C5:C13, F5:F8, and in the Notes in H11:J13.
- Highlight C5:C13 (with all the sheets still grouped) and press DELETE.
- Highlight F5:F8 (with all the sheets still grouped) and press DELETE.
- Highlight H11:J13 (with all the sheets still grouped) and press DELETE.
- Press CTRL+~ to switch back to Normal view.
- Ungroup the sheets. Look through the sheets to check that only the data has been deleted. Notice the error message #DIV/O appears in I6:I7 since the data for this formula has been deleted. Your January sheet should look like Figure 7.10.
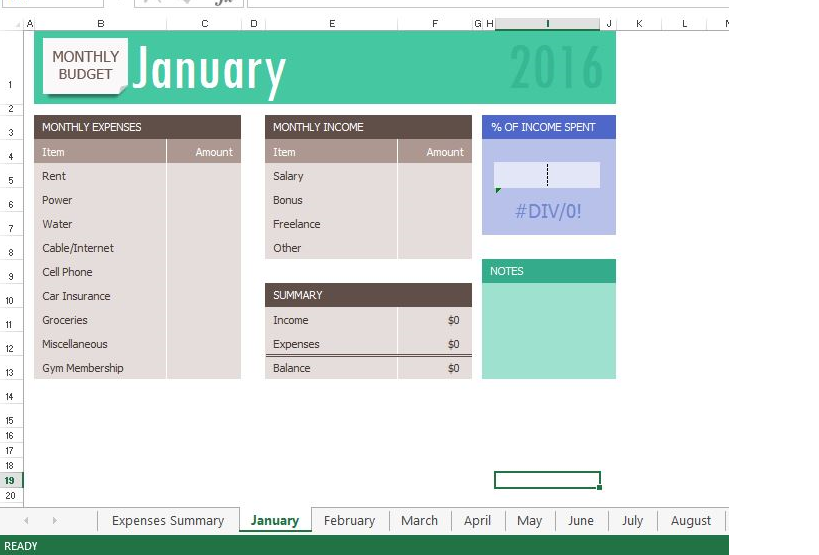
NOTE: There are only formulas and the pie chart in the Expenses Summary sheet, so nothing needs to be deleted from this sheet to setup your template.
- Click the File tab in the ribbon and then click Save As.
- Choose the location where you want to save the file.
- In the Save as type pull-down list, select Excel Template (*.xltx).
- At the top of the screen, double-check that the location you want to save the file to has not changed. If it has, use the pull-down list to find the location where you want to save your file. BE CAREFUL HERE! By default, Excel will try to save this to a default template file location on your hard drive.
- Type in the file name CH6 Personal Budget Template.xltx. Check your screen carefully with Figure 6.11. Keep in mind that you may be saving your template file to a different place on your computer. By default, Excel will save the template to your hard drive assuming you always work on the same computer.
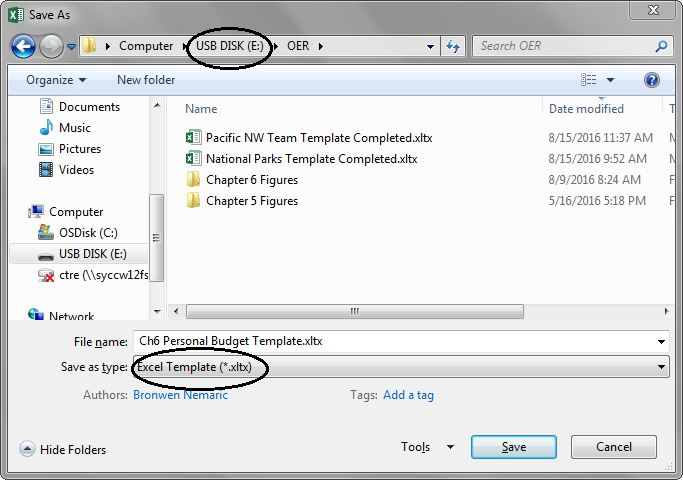
Figure 7.11 Save As Template - Click Save.
Skills Refresher
To save a file you created as a template:
- Click the File tab in the ribbon and then click Save As.
- Choose the location where you want to save the file.
- In the Save as type pull-down list, select Excel Template (*.xltx).
- At the top of the screen, double-check that the location you want to save the file to has not changed. If it has, use the pull-down list to find the location where you want to save your file. BE CAREFUL HERE! By default, Excel will try to save this to a default template file location on your hard drive.
- Type in the file name
- Click Save.
We are now going to use our new budget template to start a Personal Budget file for 2017. We want to use the Ch6 Personal Budget Template to create the new file, but we don’t want to overwrite the template. We want to keep it clean to use to start each new year’s file. To do this, we’ll save the file to our new 2017 file name before we start filling in any data.
- With the CH6 Personal Budget Template open, click the File tab in the ribbon.
- Choose Save As and choose the location where you want to save the 2017 version of the file.
- Change the Save as Type back to Excel Workbook (*.xlsx).
- Enter the File name CH7 2017 Personal Budget. Compare your screen to Figure 7.12.
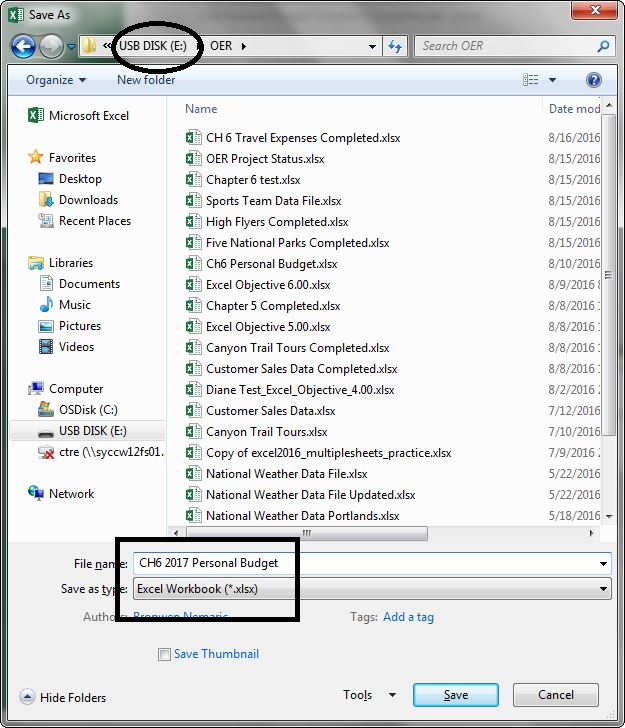
Figure 7.12 Save As 2017 Budget File - Click Save.
- Group all the sheets together including the Expenses Summary sheet.
- Click on H1. Type 2017 and press ENTER.
- Ungroup the sheets.
- Click on the January sheet. Enter the following data in Figure 6.13:
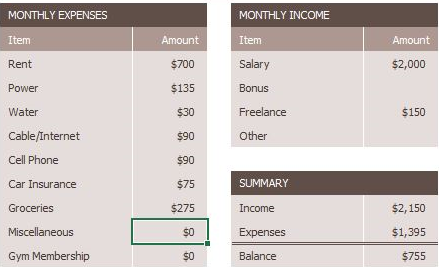
Figure 7.13 January 2017 Data - Click on the Expenses Summary sheet – the data and the pie chart should show the January data since that is all the data in the twelve month sheets for now.Your sheet should look like Figure 7.14.
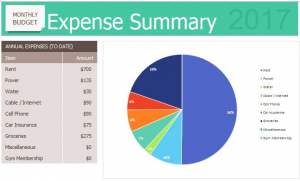
- Figure 7.14 Expense Summary Sheet
- Save your file for your records.
Key Takeaways
- There are many pre-designed templates in Excel developed in Excel that you can use. This will save you the time and effort of designing and creating these files from scratch.
- You can create your own template files in Excel that you can use over and over again.
Attribution
“6.3 Templates” by Diane Shingledecker, Portland Community College is licensed under CC BY 4.0
